Thursday 16 May 2013

ABAP System Variables


ABAP System Variables


ABAP system variables is accessible from all ABAP programs. These fields are filled by the runtime environment. The values in these fields indicate the state of the system at any given point of time.
The complete list of ABAP system variables is found in the SYST table in SAP. Individual fields of the SYST structure can be accessed either using “SYST-” or “SY-”.
WRITE:/ 'ABAP System Variables'.
WRITE:/ 'Client : ', sy-mandt.
WRITE:/ 'User : ', sy-uname.
WRITE:/ 'Date : ', sy-datum.
WRITE:/ 'Time : ', sy-uzeit.
Output
ABAP-System-Variables

Thursday 9 May 2013

ABAP Variables


ABAP Variables


ABAP Variables are instances of data types. Variables are created during program execution and destroyed after program execution.
Use keyword DATA to declare a variable.
DATA: firstname(10) TYPE c,
      index         TYPE i,
      student_id(5) TYPE n.
While declaring a variable we can also refer to an existing variable instead of data type. For that use LIKE instead ofTYPE keyword while declaring a variable.
DATA: firstname(10) TYPE c,
      lastname(10)  LIKE firstname. " Observe LIKE keyword
Structured Variable
Similar to structured data type, structured variable can be declared using BEGIN OFand END OF keywords.
DATA: BEGIN OF student,
      id(5)     TYPE n,
      name(10)  TYPE c,
      dob       TYPE d,
      place(10) TYPE c,
      END OF student.
We can also declare a structured variable by referring to an existing structured data type.
TYPES: BEGIN OF address,
       name(10)   TYPE c,
       street(10) TYPE c,
       place(10)  TYPE c,
       pincode(6) type n,
       phone(10)  type n,
       END OF address. 

Data: house_address  type address,
      office_address like house_address.
Each individual field of the structured variable can be accessed using hyphen (-). For example, name field of the house_address structure can be accessed using housing_address-name.
Character is the default data type.
DATA: true.  " By default it will take C as data type

ABAP Data Types and Constants


ABAP Data Types and Constants


Data Type describes the technical characteristics of a Variable of that type. Data type is just the blue print of a variable.
Predefined ABAP Types
DATA TYPEDESCRIPTIONDEFAULT LENGTHDEFAULT VALUE
CCharacter1‘ ‘
NNumeric10
DDate800000000
TTime6000000
XHexa Decimal1X’0′
IInteger40
PPacked80
FFloat80
User defined data types
Use TYPES keyword to define the data types.
TYPES: name(10) TYPE c,
       length   TYPE p DECIMALS 2,
       counter  TYPE i,
       id(5)    TYPE n.
Structured data types
Structured data type is grouping of several simple data types under one name.
Use the keywords BEGIN OF and END OF to create a structured data type.
TYPES: BEGIN OF student,
        id(5)     TYPE n,
        name(10)  TYPE c,
        dob       TYPE d,
        place(10) TYPE c,
        END OF student.
Constants
Constants are used to store a value under a name. We must specify the value when we declare a constant and the value cannot be changed later in the program.
Use CONSTANTS keyword to declare a constant.
CONSTANTS: pi  TYPE p DECIMALS 2 VALUE '3.14',
           yes TYPE c VALUE 'X'.

Friday 3 May 2013

First abap program


Let us write a “Hello SAP ABAP” program.
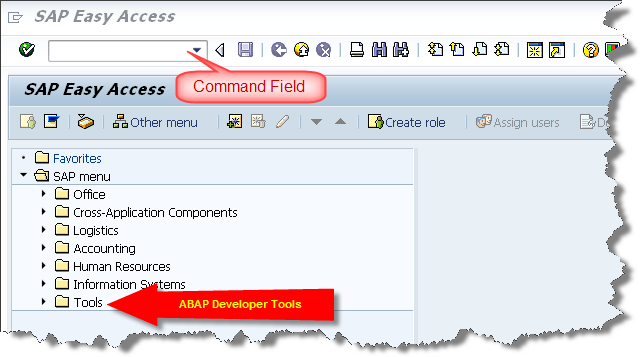
Navigate to ABAP editor under Tools node in SAP easy access.
First-ABAP-Program-1
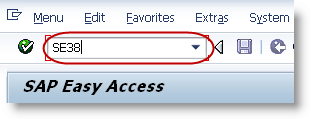
Double click on “ABAP Editor” to open the editor. ABAP editor can also be opened by entering t-code SE38 in the command field.
First-ABAP-Program-2
This is the ABAP editor’s initial screen. Enter the name of the program you want to create and press create. All the customer programs must begin with “Y” or “Z”.
First-ABAP-Program-3
In the next popup screen(Program attributes) enter the title for your program, select Executable program as type and press save.
First-ABAP-Program-4
Press Local Object to store the program in the temporary folder.
First-ABAP-Program-5
This is the screen where you can write the ABAP code.
First-ABAP-Program-6
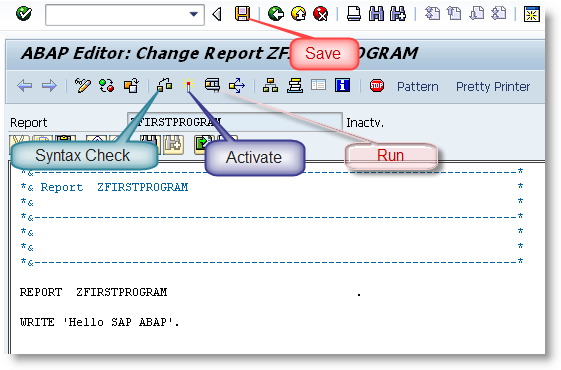
Write the code. Press save, then syntax check( Ctrl + F2 ).
First-ABAP-Program-7
If there are any syntax errors, it ill be displayed at the bottom of the screen as shown above. Correct the errors and again check the syntax.
First-ABAP-Program-8
Successful syntax check message will be displayed in the status bar. Then activate( Ctrl + F3 ) the program.
First-ABAP-Program-9
In the following screen select your program and press continue. Then run(F8) the program.
First-ABAP-Program-10
The output will be displayed as shown above.

Wednesday 1 May 2013

SAP Transaction Code


What is SAP transaction code?


SAP Transaction code is a short cut key attached to a screen. Instead of using SAP easy access menu we can also navigate to a particular screen in SAP by entering the transaction code (T-code for short) in the command field of the standard toolbar.
What-is-SAP-Tcode
Some of the useful transaction codes for ABAP developers.
T CODEDESCRIPTION
SE11ABAP Data Dictionary
SE16Data Browser
SE37Function Builder
SE38ABAP Editor
SE41Menu Painter
SE51Screen Painter
SE71SAP Script Layout
SE80ABAP Workbench
SE91Message Maintenance
SE93Maintain Transaction

Tuesday 30 April 2013

Login to SAP System

First find the SAP icon on the desktop.  
Login-to-sap-1
Double click on the SAP icon.
Login-to-sap-2
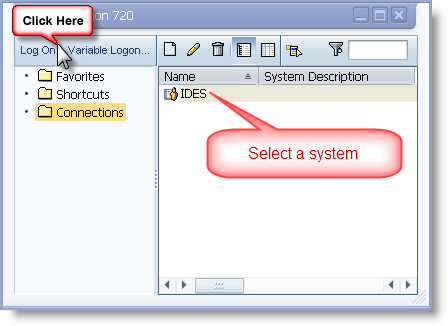
On the logon pad select the system you want to login to and press log on button.
Login-to-sap-3
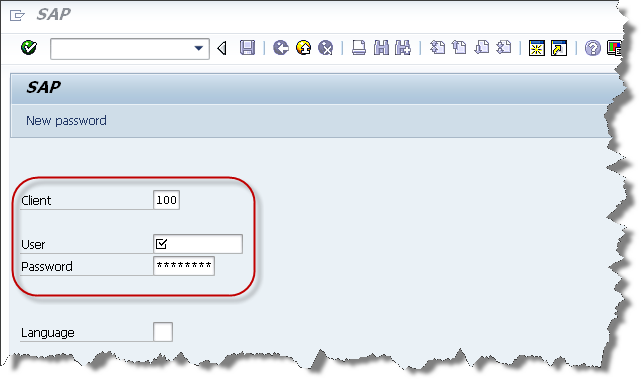
Enter Client, User, password and press enter.
Login-to-sap-4
This is SAP easy access screen. All the tools required by ABAP developer is under the node Tools.

Monday 29 April 2013

ABAP Language Introduction

ABAP stands for Advanced Business Application Programming. It is a programming language developed by SAP.
ABAP language syntax
  • ABAP is not case sensitive.
  • Every statement begins with a keyword and ends with a period.( WRITE is the keyword to print on screen )
    WRITE 'Hello World!'.
  • Chained statements.If consecutive statements have identical part at the beginning, then ABAP allows you to chain these statements into a single statement. First write the identical part once and then place a colon (:). Then write the remaining parts of the individual statements separated by commas.Normal Statements:
    WRITE 'Hello'.
    WRITE 'ABAP'.
    Chained Statement:
    WRITE: 'Hello', 'ABAP'.
Comments:- 

They are two types of comments in abap 
1. full line comments ( are  specified by * at first column in a row).
2.inline comments  ( are  specified by " after . or , at the  end of any statement).
used for: documentation of the  program within the  program.
purpose:-
          1. easy understanding of entire program ,
          2.future enhancements( or) modifications  can be easily done.
  • If you want to make the entire line as comment, then enter asterisk (*) at the beginning of the line.
    * This is a comment line 
    If you want to make a part of the line as comment, then enter double quote (“) before the comment.
    WRITE 'COMMENT'.   "Start of comment

Wednesday 20 February 2013

Keyboard Shortcuts(Microsoft Windows)

Keyboard Shortcuts (Microsoft Windows)
1. CTRL+C (Copy)
2. CTRL+X (Cut)
...... 3. CTRL+V (Paste)
4. CTRL+Z (Undo)
5. DELETE (Delete)
6. SHIFT+DELETE (Delete the selected item permanently without placing the item in the Recycle Bin)
7. CTRL while dragging an item (Copy the selected item)
8. CTRL+SHIFT while dragging an item (Create a shortcut to the selected item)
9. F2 key (Rename the selected item)
10. CTRL+RIGHT ARROW (Move the insertion point to the beginning of the next word)
11. CTRL+LEFT ARROW (Move the insertion point to the beginning of the previous word)
12. CTRL+DOWN ARROW (Move the insertion point to the beginning of the next paragraph)
13. CTRL+UP ARROW (Move the insertion point to the beginning of the previous paragraph)
14. CTRL+SHIFT with any of the arrow keys (Highlight a block of text)
SHIFT with any of the arrow keys (Select more than one item in a window or on the desktop, or select text in a document)
15. CTRL+A (Select all)
16. F3 key (Search for a file or a folder)
17. ALT+ENTER (View the properties for the selected item)
18. ALT+F4 (Close the active item, or quit the active program)
19. ALT+ENTER (Display the properties of the selected object)
20. ALT+SPACEBAR (Open the shortcut menu for the active window)
21. CTRL+F4 (Close the active document in programs that enable you to have multiple documents opensimultaneou sly)
22. ALT+TAB (Switch between the open items)
23. ALT+ESC (Cycle through items in the order that they had been opened)
24. F6 key (Cycle through the screen elements in a window or on the desktop)
25. F4 key (Display the Address bar list in My Computer or Windows Explorer)
26. SHIFT+F10 (Display the shortcut menu for the selected item)
27. ALT+SPACEBAR (Display the System menu for the active window)
28. CTRL+ESC (Display the Start menu)
29. ALT+Underlined letter in a menu name (Display the corresponding menu) Underlined letter in a command name on an open menu (Perform the corresponding command)
30. F10 key (Activate the menu bar in the active program)
31. RIGHT ARROW (Open the next menu to the right, or open a submenu)
32. LEFT ARROW (Open the next menu to the left, or close a submenu)
33. F5 key (Update the active window)
34. BACKSPACE (View the folder onelevel up in My Computer or Windows Explorer)
35. ESC (Cancel the current task)
36. SHIFT when you insert a CD-ROMinto the CD-ROM drive (Prevent the CD-ROM from automatically playing)
Dialog Box - Keyboard Shortcuts
1. CTRL+TAB (Move forward through the tabs)
2. CTRL+SHIFT+TAB (Move backward through the tabs)
3. TAB (Move forward through the options)
4. SHIFT+TAB (Move backward through the options)
5. ALT+Underlined letter (Perform the corresponding command or select the corresponding option)
6. ENTER (Perform the command for the active option or button)
7. SPACEBAR (Select or clear the check box if the active option is a check box)
8. Arrow keys (Select a button if the active option is a group of option buttons)
9. F1 key (Display Help)
10. F4 key (Display the items in the active list)
11. BACKSPACE (Open a folder one level up if a folder is selected in the Save As or Open dialog box)

Microsoft Natural Keyboard Shortcuts
1. Windows Logo (Display or hide the Start menu)
2. Windows Logo+BREAK (Display the System Properties dialog box)
3. Windows Logo+D (Display the desktop)
4. Windows Logo+M (Minimize all of the windows)
5. Windows Logo+SHIFT+M (Restorethe minimized windows)
6. Windows Logo+E (Open My Computer)
7. Windows Logo+F (Search for a file or a folder)
8. CTRL+Windows Logo+F (Search for computers)
9. Windows Logo+F1 (Display Windows Help)
10. Windows Logo+ L (Lock the keyboard)
11. Windows Logo+R (Open the Run dialog box)
12. Windows Logo+U (Open Utility Manager)
13. Accessibility Keyboard Shortcuts
14. Right SHIFT for eight seconds (Switch FilterKeys either on or off)
15. Left ALT+left SHIFT+PRINT SCREEN (Switch High Contrast either on or off)
16. Left ALT+left SHIFT+NUM LOCK (Switch the MouseKeys either on or off)
17. SHIFT five times (Switch the StickyKeys either on or off)
18. NUM LOCK for five seconds (Switch the ToggleKeys either on or off)
19. Windows Logo +U (Open Utility Manager)
20. Windows Explorer Keyboard Shortcuts
21. END (Display the bottom of the active window)
22. HOME (Display the top of the active window)
23. NUM LOCK+Asterisk sign (*) (Display all of the subfolders that are under the selected folder)
24. NUM LOCK+Plus sign (+) (Display the contents of the selected folder)
25. NUM LOCK+Minus sign (-) (Collapse the selected folder)
26. LEFT ARROW (Collapse the current selection if it is expanded, or select the parent folder)
27. RIGHT ARROW (Display the current selection if it is collapsed, or select the first subfolder)
Shortcut Keys for Character Map
After you double-click a character on the grid of characters, you can move through the grid by using the keyboard shortcuts:
1. RIGHT ARROW (Move to the rightor to the beginning of the next line)
2. LEFT ARROW (Move to the left orto the end of the previous line)
3. UP ARROW (Move up one row)
4. DOWN ARROW (Move down one row)
5. PAGE UP (Move up one screen at a time)
6. PAGE DOWN (Move down one screen at a time)
7. HOME (Move to the beginning of the line)
8. END (Move to the end of the line)
9. CTRL+HOME (Move to the first character)
10. CTRL+END (Move to the last character)
11. SPACEBAR (Switch between Enlarged and Normal mode when a character is selected)
Microsoft Management Console (MMC)
Main Window Keyboard Shortcuts
1. CTRL+O (Open a saved console)
2. CTRL+N (Open a new console)
3. CTRL+S (Save the open console)
4. CTRL+M (Add or remove a console item)
5. CTRL+W (Open a new window)
6. F5 key (Update the content of all console windows)
7. ALT+SPACEBAR (Display the MMC window menu)
8. ALT+F4 (Close the console)
9. ALT+A (Display the Action menu)
10. ALT+V (Display the View menu)
11. ALT+F (Display the File menu)
12. ALT+O (Display the Favorites menu)

MMC Console Window Keyboard Shortcuts
1. CTRL+P (Print the current page or active pane)
2. ALT+Minus sign (-) (Display the window menu for the active console window)
3. SHIFT+F10 (Display the Action shortcut menu for the selected item)
4. F1 key (Open the Help topic, if any, for the selected item)
5. F5 key (Update the content of all console windows)
6. CTRL+F10 (Maximize the active console window)
7. CTRL+F5 (Restore the active console window)
8. ALT+ENTER (Display the Properties dialog box, if any, for theselected item)
9. F2 key (Rename the selected item)
10. CTRL+F4 (Close the active console window. When a console has only one console window, this shortcut closes the console)
Remote Desktop Connection Navigation
1. CTRL+ALT+END (Open the Microsoft Windows NT Security dialog box)
2. ALT+PAGE UP (Switch between programs from left to right)
3. ALT+PAGE DOWN (Switch between programs from right to left)
4. ALT+INSERT (Cycle through the programs in most recently used order)
5. ALT+HOME (Display the Start menu)
6. CTRL+ALT+BREAK (Switch the client computer between a window and a full screen)
7. ALT+DELETE (Display the Windows menu)
8. CTRL+ALT+Minus sign (-) (Place a snapshot of the active window in the client on the Terminal server clipboard and provide the same functionality as pressing PRINT SCREEN on a local computer.)
9. CTRL+ALT+Plus sign (+) (Place asnapshot of the entire client window area on the Terminal server clipboard and provide the same functionality as pressing ALT+PRINT SCREEN on a local computer.)

Microsoft Internet Explorer Keyboard Shortcuts
1. CTRL+B (Open the Organize Favorites dialog box)
2. CTRL+E (Open the Search bar)
3. CTRL+F (Start the Find utility)
4. CTRL+H (Open the History bar)
5. CTRL+I (Open the Favorites bar)
6. CTRL+L (Open the Open dialog box)
7. CTRL+N (Start another instance of the browser with the same Web address)
8. CTRL+O (Open the Open dialog box,the same as CTRL+L)
9. CTRL+P (Open the Print dialog box)
10. CTRL+R (Update the current Web )